
The in2 app is your central tool for booking, managing sessions, and staying connected with your favorite fitness facilities. Here's a breakdown of its main sections:
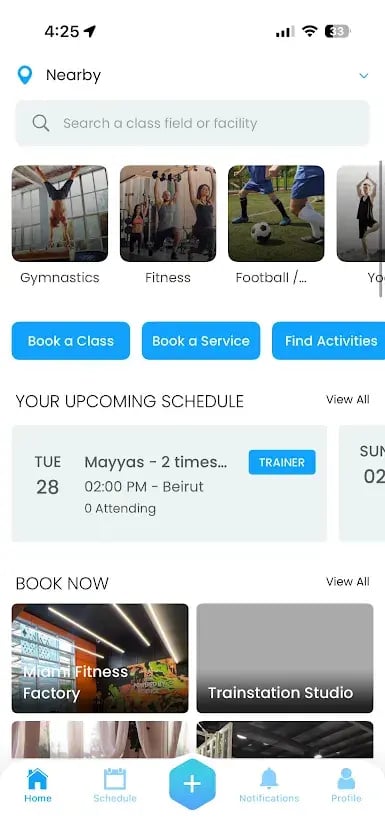
HOME SCREEN
-
LOCATION & SEARCH
📍 Tap your location (top left, e.g. "Nearby") anytime to switch areas.
🔍 Use the search bar below it to quickly find a class, field, or facility by name.
-
BROWSE BY CATEGORY
Scroll through the photo tiles — Gymnastics, Fitness, Football, Yoga, and more — and tap any tile to jump straight into that category.
-
QUICK ACTIONS
Three buttons sit front and center:
Book a Class ➡️ instantly browse and reserve a spot in an available class
Book a Service ➡️ choose a category to view all businesses offering that service
Find Activities ➡️ discover games and sessions happening near you -
YOUR UPCOMING SCHEDULE
A horizontal scroll keeps your next sessions at a glance. Each card shows:
Day + date
Session name
Time & location
Attending count
🔵 A TRAINER badge appears if you're the instructor of the session.
➡️ Tap View All to see your full schedule (past + upcoming). -
BOOK NOW
Shows the businesses you're connected to, ready to book straight from the home screen.
➡️ Tap View All to see more options.
-
BOTTOM NAVIGATION
🏠 Home 📅 Schedule ➕ Create 🔔 Notifications 👤 Profile
Tap the ➕ icon to create an activity/game or book a private session (trainers only).
The facility search will now display results in two sections:
- Facilities within the selected distance (default 25km)
- Facilities outside the selected distance (default 25km)
When the user changes the distance filter; for example, from 25 km to 50 km or 5 km, both sections will automatically update based on the selected range.
.webp?width=410&height=838&name=unnamed%20(1).webp)
.webp?width=410&height=838&name=unnamed%20(2).webp)
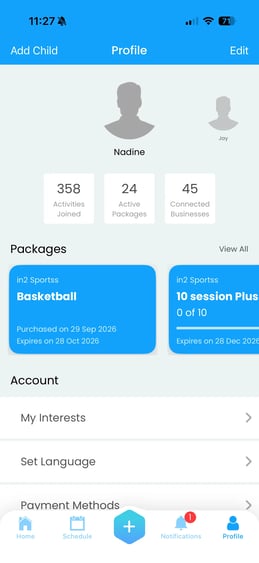
PROFILE
1. TOP BAR
- Add Child ➡️ link a child's profile to yours
- Edit ➡️ update your profile details and photo
2. PROFILE OVERVIEW
Shows your name and photo, plus quick stats:
- Activities Joined
- Active Packages
- Connected Businesses
3. PACKAGES
A horizontal scroll of your current packages, each card showing:
- Package name & business
- Sessions used (e.g. 0 of 3)
- Expiry date (or "No expiry date")
➡️ Tap View All to see all packages, including used/expired ones.
4. ACCOUNT
- My Interests ➡️ manage the activity categories you follow
- Set Language ➡️ change your app language
- Payment Methods ➡️ manage saved cards/payment options (COMING SOON)
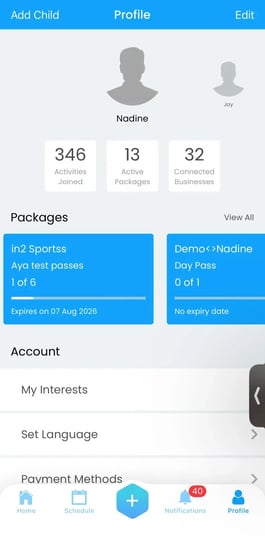
This section gives you full visibility into your current memberships and activity history.
BUY PACKAGE
When booking from a business you're connected to, you'll see the Buy Package option — letting you choose and purchase directly from your available price list.
1. HOW IT WORKS
Packages are grouped by category with a search bar at the top to help you find what you need quickly.
➡️ Simply select your package, review the price, and complete the purchase.
2. PACKAGE CATEGORIES
- Class Package ➡️ passes based for group classes
- Private Session ➡️ sessions for one-on-one or personal training
- Contract ➡️ membership plans with a fixed term
- Registration ➡️ one-time sign-up or enrollment fee
- Day Pass ➡️ single-day access to facilities or classes
- Combo Package ➡️ bundle combining multiple services (e.g., classes + private sessions) in one package
3. ABOUT COMBO PACKAGES
Combo packages make it easy for clients to grab multiple services in a single click, while giving businesses the flexibility to add discounts and special offers to drive more sales.
For example, two packages priced at $45 separately can be bundled as a combo for $40, making the deal simple, attractive, and easy to book.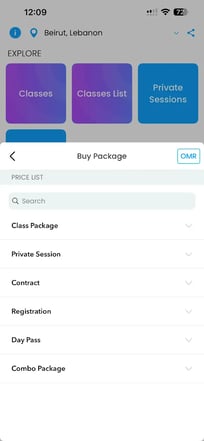
sUBMIT ATTENDANCE (FOR TRAINERS)
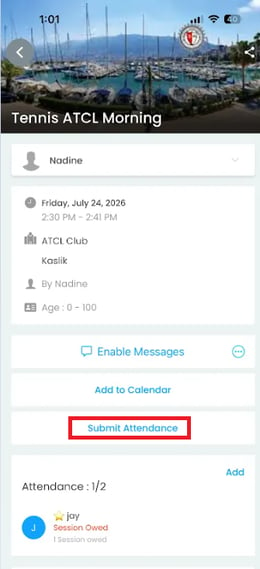
Trainers can now mark attendance directly from the app — no need to wait until after the session.
1. OPEN THE SESSION
From your schedule, tap on the session card to open its details (date, time, location, and client list).
2. SUBMIT ATTENDANCE
Tap Submit Attendance to open the attendance list for that session.
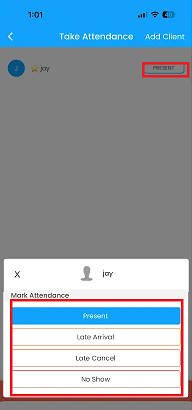
3. MARK EACH CLIENT
➡️ Tap Present next to a client's name to open the status options:
- Present
- Late Arrival
- Late Cancel
- No Show
Now you can search by the name of the attendee
This will help trainers with large number of attendees to navigate through names seamlessly!
ADD TO CALENDAR
Tap Add to Calendar to save the session straight to your phone's calendar — handy for keeping track of your schedule outside the app.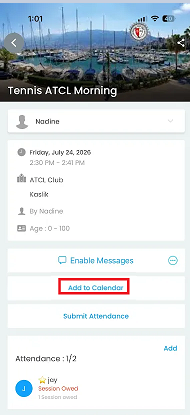
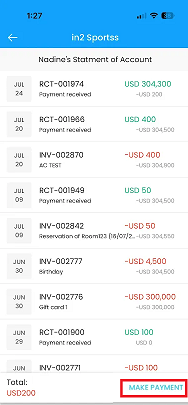
pAY OUTSTANDING BALANCE
Clients can view and settle their balance with a business directly from the app.
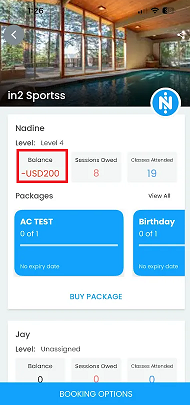
1. VIEW YOUR BALANCE
On the business page, your Balance shows any outstanding amount owed (displayed in red if unpaid).2. VIEW STATEMENT OF ACCOUNT
Tap the balance to open your full Statement of Account, listing all transactions:- Payments received
- Invoices (Packages, POS... etc.)
- Refunds
Each entry shows the date, reference number, description, amount, and running balance.
3. MAKE PAYMENT
➡️ Tap Make Payment at the bottom to settle your balance.
Choose your preferred payment method and complete the payment.
APP NOTIFICATIONS :
Notifications that are received from the app
For the Clients:
- Class Reminder
- New PT Session
- Activity/Class Cancelled
- Activity/Class Change
- Removed From Wait-list
For the staff/trainer:
-
"{name} joined your class"
-
"{name} cancelled his/her PT session or class booking"
- "{name} could not be moved from the wait-list"
🔴 Note that:
Class Reminders — Set to 6 hours before by default, but your gym/studio can adjust this to anywhere between 15 minutes and 2 days before, and can set more than one reminder.
"Someone Joined Your Class" — Only fires when a client books themselves via the app or website. If a staff member books them from the portal instead, no notification is sent.
Muting Notifications — You can turn off these in your app settings: Class Reminders, Cancellations, PT Booked, Review Requests, and Promos. All other notifications can't be muted.