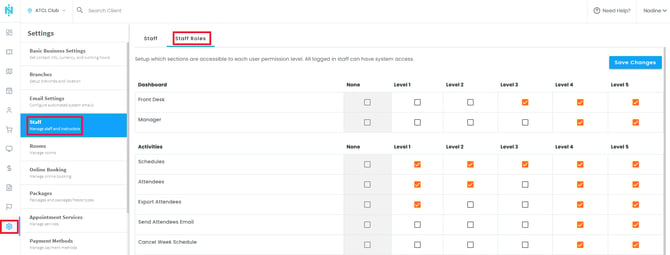
Go to Company Settings > Staff > Staff Roles to assign permission levels.
Staff Roles
Dashboard
- Front Desk – Access to the front-desk dashboard (check-ins, daily schedule overview, walk-in actions).
- Manager – Access to the management dashboard with broader operational and business metrics.
Activities
- Schedules – View and manage the class/activity schedule.
- Attendees – View and manage attendee lists for classes.
- Export Attendees – Export attendee lists to a file (e.g., Excel/CSV).
- Send Attendees Email – Send email communications to class attendees.
- Cancel Week Schedule – Cancel an entire week of scheduled classes at once.
- View – View activity/class details.
- Delete Attendees from Upcoming Sessions – Remove attendees from future scheduled sessions.
- Delete Attendees from Past Sessions – Remove attendees from already-completed sessions.
- Show Classes From All Branches – View classes across all branches, not just the user's assigned branch.
Private Sessions
- View – View private (1:1) session bookings.
- Scheduling – Create, edit, or reschedule private sessions.
- Undo Appointment Arrival – Reverse a private session's "arrived/checked-in" status.
- Ability To Early Cancel Old Sessions – Early Cancel previous private sessions outside the normal cancellation window.
Fields, Rooms
- View – View field/room booking calendar.
- Scheduling – Create, edit, or reschedule field/room bookings.
- Early Cancel Reservation – Cancel a field/room reservation ahead of the standard cancellation policy.
- Undo Rental Attendance – Reverse recorded attendance for a field/room rental.
Clients
- Check in to Gym – Check a client into the facility.
- View – View client profiles.
- Add Edit – Create new clients or edit existing profiles.
- Delete – Delete a client record.
- Merge – Merge duplicate client records.
- Import – Bulk import client data.
- Export – Export client data.
- Sponsor Approve – Approve a client's sponsor/corporate affiliation.
- Mark as Trusted – Flag a client as a trusted account (e.g., relaxed payment rules).
- Buy Membership – Sell/assign a new package to a client.
- Edit Membership – Modify an existing package.
- Delete Membership – Remove a package from a client's account.
- Apply Discount – Apply a discount to a client purchase.
- Buy on Account – Allow a client purchase to be billed to their account (deferred payment).
- Refund Payment – Process a refund to a client.
- Receive Payment – Record a payment received from a client.
- Add Credit Note – Issue a credit note to a client account.
- Buy Membership Adjust – Adjust the terms/price of a package purchase.
- Edit Fields – Edit field's bookings.
- Edit Transaction – Modify an existing financial transaction.
- Delete Transaction – Delete a financial transaction.
- Change Transaction Date – Backdate/change the date of a transaction.
- Accounting Add Opening Balance – Add an opening balance to a client's account for billing purposes.
- Client Send Payment Link – Send a client a payment link.
- Manage Companies – Manage corporate/company accounts linked to clients.
- Edit Client Branch – Reassign a client to a different branch.
- Add Client Note – Add an internal note to a client's profile.
- Delete Client Note – Delete a client note.
- Edit Client Note – Edit an existing client note.
- Confirm Client Note – Mark/confirm a client note (e.g., acknowledgment workflow).
- Manage Kit – Manage equipment/kit assigned to a client.
- Change Client Level – Change a client's membership/access level.
- Ability To Freeze Packages – Freeze a client's active package/membership.
- Blacklist A Client – Add a client to the blacklist.
- Whitelist A Client – Remove a client from the blacklist.
- Clients Send Email – Send email communications to clients.
- Accounting Edit Invoice Branch – Edit which branch an invoice is attributed to.
- Client Pdfs – Generate/access client-related PDF documents.
POS (Point of Sale)
- View – View the POS screen and transaction history.
- Sell – Process sales through the POS.
- Return – Process product/item returns.
- Filter By All Branches – View POS data across all branches.
- POS Buy On Account – Allow POS purchases billed to a client's account.
- POS Change Status – Change the status of a POS order/transaction.
Reports
- Financial – Access financial reports.
- Attendance – Access attendance reports.
- Payroll – Access payroll reports.
- Reminders Notifications – Access reminders/notifications report.
- Report Export Excel – Export reports to Excel.
- Reports Visitors – Access visitor reports.
- Reports Staff – Access staff performance/activity reports.
- Freeze Report – Access report on frozen packages/memberships.
- Reports Daily Financials – Access daily financial summary reports.
- Clients Reports – Access general client reports.
- Package Report – Access package/membership sales reports.
- Blacklisted Clients Report – Access report of blacklisted clients.
- View Promo Code Usage Report – View how promo codes have been used.
- View Promo Code Performance Report – View performance/ROI of promo codes.
- Delete Sessions Owed – Delete records of sessions owed to clients.
- Class Earnings – View earnings generated by classes.
- Appointment Earnings – View earnings generated by appointments.
- View Ratings And Reviews Report – View client ratings and reviews report.
- Export Ratings And Reviews Report – Export the ratings and reviews report.
Company Settings
- Basic Settings – Manage core company/studio settings.
- Staff – Manage staff accounts.
- Branches – Manage branch/location settings.
- Fields, Rooms – Manage field/room configuration.
- Packages Services – Manage packages and services offered.
- Payment Methods – Manage accepted payment methods.
- Discounts – Manage discount codes/rules.
- Inventory – Manage inventory items.
- Staff Roles – Manage staff role definitions and permissions.
- Manage Email Settings – Configure system email settings.
- Manage Staff Termination – Process staff offboarding/termination.
- Edit Staff Access Level – Change a staff member's access level.
- Change Levels Settings – Configure client level/tier settings.
- Override Adding Client Outside Level – Allow adding a client outside their normal level restrictions.
- View In2 Subscription – View the company's in2 subscription details.
- Add Waiver – Add a liability waiver template.
- Manage Categories – Manage service/product categories.
- Manage Staff Notifications – Configure staff notification settings.
- Printout Language – Set the language used for printed documents.
- Online Booking – Manage online booking settings.
- Bulk Package Price Update – Update pricing for multiple packages at once.
- Toggle Ratings And Reviews – Enable/disable the ratings and reviews feature.
- Manage In2 Subscription – Manage/modify the company's in2 subscription.
- Migrate Staff Accounts – Migrate staff account data (e.g., between branches/systems).
- Migrate Branch Data – Migrate data between branches.
- Manage Class Chat Access – Control access to class chat features.
Mobile App
- Add Attendee to Class – Add an attendee to a class via the mobile app.
- Submit Class Attendance – Mark class attendance via the mobile app.
- Schedule Own Private Session – Book a private session for oneself via the mobile app.
- View Activity Attendee Package Status – View an attendee's package status via the mobile app.
- View Activity Attendee Balance – View an attendee's account balance via the mobile app.
Expense
- View Expense – View recorded expenses.
- Manage Expense – Add or edit expenses.
- Delete Expense – Delete an expense record.
- Manage Expense Types – Manage expense category types.
Supplier
- View Suppliers – View supplier records.
- Manage Suppliers – Add or edit supplier records.
- Manage Supplier Payment – Record/manage payments to suppliers.
Payroll
- Payroll Report – Access payroll reporting.
- View Pay Rates – View staff pay rates.
- Add Pay Rates – Add new pay rate structures.
- Edit Pay Rates – Edit existing pay rates.
- Copy Pay Rates – Duplicate a pay rate structure.
- Delete Pay Rates – Delete a pay rate structure.
- Assign Pay Rates – Assign a pay rate to a staff member.
- Bulk Assign Pay Rates – Assign pay rates to multiple staff members at once.
Lead
- Access Lead Module – Access the leads/CRM module.
- Add Lead – Create a new lead record.
- Edit Lead – Edit an existing lead record.
- Delete Lead – Delete a lead record.
- Access Form Link – Access lead capture form links.
- Edit Form Link – Edit lead capture form link settings.
How it works
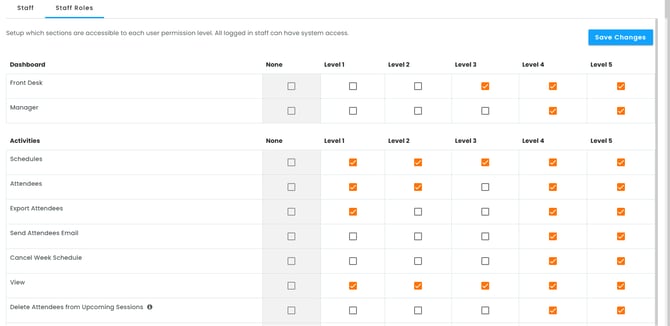
- Each row is a section (e.g., Front Desk, Manager, Schedules, Attendees).
- Each column is a permission level: None, Level 1, Level 2, Level 3, Level 4, Level 5.
- Tick the box ☑️ under a level to grant that level access to that section.
- Untick the box ⬜ to remove/disable access for that level.
- The None column is greyed out and non-editable — it just represents "no access."
- Higher levels don't automatically inherit lower-level access — each checkbox is independent, so every level must be set individually per section.
📝 Steps
- Locate the section row you want to update (e.g., "Export Attendees").
- Find the column for the level you want to change (e.g., "Level 2").
- Tick the checkbox to allow that level to access the section, or untick it to block access.
- Repeat for any other sections/levels you need to adjust.
- Once all changes are made, click Save Changes ➡️ located at the top and bottom right of the screen.
⚠️ Important
- Changes are not saved automatically — you must click Save Changes before leaving the page, or your edits will be lost.
- Save Changes appears in both locations — at the top-right of the page and again at the bottom after the last section. You can save from whichever is more convenient once you're done editing, without needing to scroll back up.
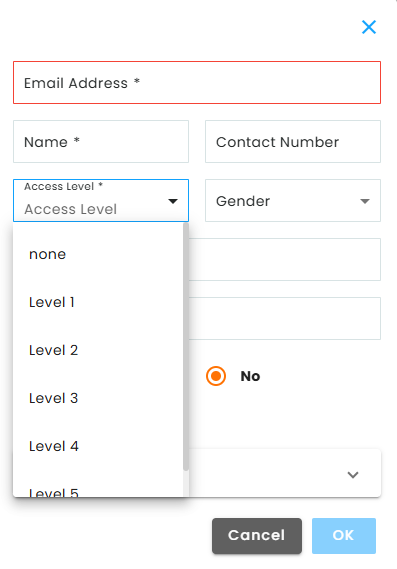
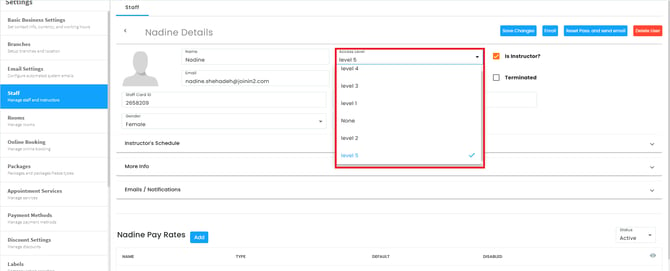
staff access level
The level of each staff is chosen when creating the staff on the portal