
We've added a complete lead generation feature to the in2 system, giving you a direct pipeline from public sign-up forms straight into your leads workflow. This guide walks you through both parts: Settings (where you build and control your forms) and Leads (where the results land and where you manage them through to conversion).
Part 1: Settings — Build and Control Your Forms
Step 1: Create a link
Start by adding a link for the channel you want to capture leads from — for example, Facebook.
- Add the link name (e.g. "Facebook").
- Click Create Link.
- Once created, you can copy the link and send it directly to your leads or clients.
You can create up to 10 links maximum, so you can run a separate link for each channel or campaign.
Step 2: Enable or disable individual links
Each link has an on/off toggle, giving you full control even after a link is already out in the world:
- Enabled — anyone with the link can open the form and submit their details.
- Disabled — if you turn a link off, anyone who already has it will no longer be able to use it.
This is useful when a campaign ends or you no longer want a particular channel collecting leads.
Step 3: Choose which fields appear on the form
Click the Settings icon to customize the fields shown on the form. For each field you have three options:
- Hidden — the field doesn't appear on the form at all.
- Visible (optional) — the lead can see and fill the field, but it's not mandatory.
- Required — the lead must fill the field before they can submit.
This lets you keep forms short to maximize conversions, or collect more detail when you need it.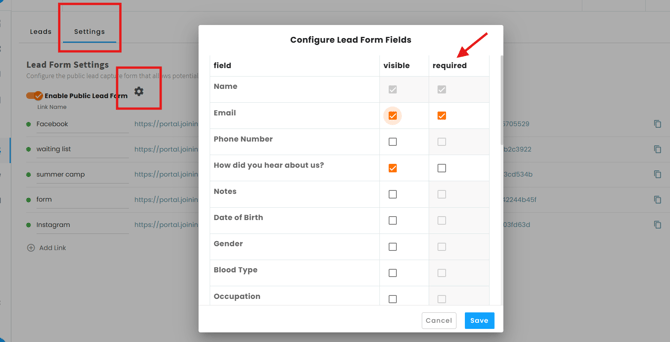
Step 4: Control all links at once
Alongside the per-link toggle, you have a master switch: Enable / Disable Public Lead Form. This works in bulk across all your links at once, instead of toggling each one individually — ideal for quickly turning the whole system on or off.
When a lead fills out a link you sent them, their information flows automatically into the Leads section.
Part 2: Leads — View and Manage What Comes In
What you see by default
The Leads section automatically shows leads that haven't been converted to clients yet, so your focus stays on prospects still in the pipeline. Remove the default filter from the Filters section and the list will show both converted and non-converted leads together.
Key metrics at a glance
At the top of the section you'll see three summary counts:
- Total Leads — every lead captured.
- New Leads (last 30 days) — leads that have come in over the past 30 days.
- Converted Leads (last 30 days) — leads that became clients in the past 30 days.
The lead table
Each lead is listed with all the details captured from the form, across columns including Name, Email, Phone, Status, Assigned To, Source, How Did You Hear, Lead Time, Last Contact Date, Next Follow-Up Date, and Created date.
Toolbar modules
A set of tools sits along the top of the Leads section to help you manage your pipeline:
- Export — download your leads (available both in the top toolbar and above the table).
- Duplicates — identify and manage duplicate lead entries.
- Filter — refine which leads appear (this is also where you remove the default "not converted" filter).
- Manage Statuses — set up and edit the status options used to track each lead.
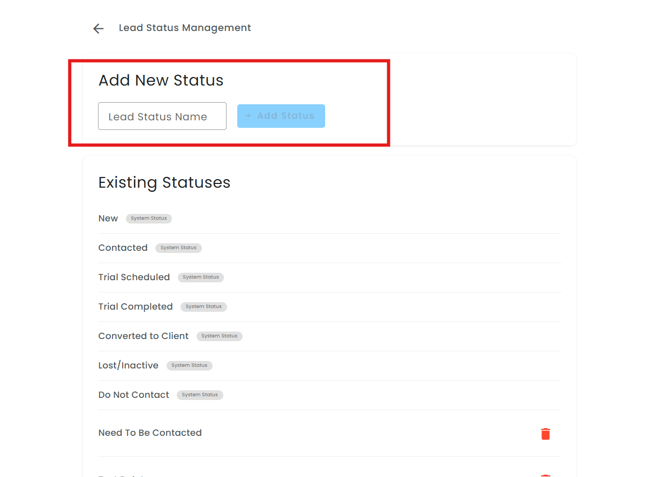
- Bulk Assign — assign leads to a staff member.
- Add Lead — manually create a new lead.
- Email — send an email directly to your leads.
- Search — quickly find a specific lead.
Editing columns (eye icon)
Click the eye icon on the right of the table to open Edit Columns, where you choose which columns to show or hide. Options include Last Contact Date, Next Follow-up Date, Created, Is Converted, Converted Date, and Conversion Type — just check or uncheck each one to customize your view.
Per-lead actions (three dots)
Click the three dots at the end of any lead's row to open its action menu:
- Edit — update the lead's details.
- Delete — remove the lead.
- Buy Package — purchase a package for the lead. Once you buy a package for a lead, they're automatically converted to a client.
Part 3: Creating a Lead Manually
When you click Add Lead, a guided wizard walks you through three steps, shown by the progress tracker on the right: Basic Information → Lead Details → Health & Goals.
Step 1: Basic Information
Fill in the lead's core contact details:
- First Name
- Last Name
- Email (optional)
- Phone (optional)
- How did you hear about us? (dropdown)

Click Next to continue, or Cancel to exit.
Step 2: Lead Details
Add the pipeline and follow-up information:
- Status (e.g. New)
- Assigned Staff (the team member responsible for the lead)
- Last Contact Date
- Next Follow-up Date
Use Prev to go back or Next to continue.
Step 3: Health & Goals, Personal Information or any Add-ons
For example Capture what the lead is looking to achieve:
- Goal
This all depends on which fields are visible.
Click Create to finish and add the lead to your list, or Prev to review the earlier steps.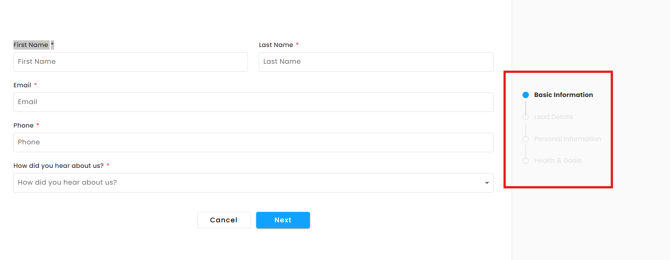
That's the full workflow: build a form in Settings, share the link, watch qualified leads land automatically in the Leads section, then manage, assign, email, and convert them into clients — or add leads manually through the guided wizard, all in one place.
For more details watch our Youtube Video!